

It's a Wiring Problem
/ I once had a mentor who liked to say, “If you can reduce it to a wiring problem, you’re half-way there.” It took me a while to really understand what this means and why it is useful advice for a software engineer. In this post, I’m going to do my best to explain it and provide you with some practical applications. I hope you find it helpful!
When we aren’t at work, we move around in a world of physical objects. Many of these objects are quite complex: airplanes, iPhones, refrigerators, and Ikea furniture. Some of these are composed of hundreds of thousands, or even millions of intricate parts (Ikea furniture), all delicately assembled in a very precise configuration. It’s easy to forget how complex some of these objects are because they present such a simple physical interface. To the consumer, the iPhone is just a solid flat rectangle.
Even easier to forget are the complex processes used to fabricate these objects. How many different vendors, machines, and stages are involved in the creation of an iPhone? It would take us a long time to count. When I was a kid, I loved the episode of Mr. Roger’s Neighborhood where they went on a field trip to the crayon factory. It amazed me that the creation of something as simple as a wax cylinder could require so much behind-the-scenes infrastructure.
Ok, so what does this have to do with my mentor’s favorite phrase and your work as a software engineer? As developers, we spend the majority of our time modeling the world around us in software. We model physical objects, processes, and relationships to name a few. We strive to break these things down into independent concepts that we then assemble together within a software system.
These systems can become just as complex (and perhaps more so) than the hardware configuration of an iPhone. If you’ve done your job well, then you can walk over to a whiteboard, draw out a whole network of software components, and show how these components relate to one another. Component A sends a message to component B which forwards it along to these three other components, C1, C2, and C3. These components perform callbacks on component B when they have finished their work, and so forth.

Great! You understand how the software system will perform it’s job once the components have been arranged properly. But how were these components arranged in the first place? How did component A ever come to know about component B? How did C1, C2, and C3 come to know about the callbacks for B? The answer is that something had to wire them together prior to the interactions you drew on the whiteboard. You drew half of your problem on the whiteboard, the other half is wiring.
Now maybe my point is clear. Just as with a complex physical object, the components in a complex running software system must be meticulously wired together. And the machinery for performing this wiring can often be just as complex as the system itself. Whenever you are solving a problem using software, remember that you are actually dealing with two separate subproblems: modeling the domain and wiring the components. Now you might be thinking, “That’s not true. I’ve worked on complex software projects and didn’t have to think much about wiring.” I’m wondering whether the code for the project looked something like this:
class Pen
  def initialize
    @ink_cartridge = InkCartridge.new(ink_color: :blue)
  end

  ...
end

class InkCartridge
  def initialize(ink_color:)
    @ink = ColoredInk.new(ink_color)
    @ball_point = BallPoint.new
  end

  ...
end

class BallPoint
  ...
end
If so, then I’d say that the wiring aspect of the system is still there, but it’s somewhat hidden. In this example, the problem of assembling a ballpoint pen and the problem of using a ballpoint pen are intermingled. The pen is creating and storing a reference to the ink cartridge, the ink cartridge is creating the ballpoint, and so on.
In the physical world, I doubt you could find a pen that created and assembled itself. But, I see this type of design all the time in the software world; and it causes trouble, as the system’s design evolves, because it attempts to address two very different problems with a single solution. Your thinking, as a developer, is muddled as you write the software because you are constantly trying to solve two distinct problems at the same time.
To make matters worse, the single solution you devise binds the two problems together, making them inseparable. Now what happens if the requirements for how the components are arranged changes? You begin to compromise the integrity of your model to meet the demands of the wiring problem.
Instead of trying to solve both problems simultaneously, what if you focus on one problem at a time? You will need to solve both problems regardless of how you approach the design, but at least if they are separated, you will have the chance to give each problem due thought. First, focus on the primary goal -- how to model your problem domain in software. Once you can confidently draw a diagram of control flow through your components for various use-cases, it’s time to turn your attention to the secondary problem of wiring these components together.
So what tools do you have at your disposal for solving the wiring problem? Well, if we are attempting to address our two problems separately then the code for solving each of them should be separate. I typically refer to the code used to wire components together as a factory. Factories can take several forms, each with its own strengths and weaknesses. In the following sections, I will describe three forms of factories.
Class Factory Methods
Let’s go back to our ballpoint pen example and use a factory to pull out the wiring code. The code fragment below shows one way we might do this.
class Pen
  def self.create
    new(InkCartridge.new(ColoredInk.new(:blue)))
  end

  def initialize(ink_cartridge)
    @ink_cartridge = ink_cartridge
  end

  ...
end
In this example, we’ve pulled the creation of the ink-cartridge out of the pen initializer and have added a new class method, create(). This method instantiates the ink-cartridge, injects it into the pen’s initializer, and returns the new pen instance. The pen initializer knows nothing about the ink-cartridge it is given. It just assigns the ink-cartridge to a member variable for use within the pen instance.
There are a few advantages with this simple refactor. First, it gives us options for how pens might be created in the future. For example, we might add several creation methods as the system evolves:
- create_ballpoint_pen()
- create_whiteboard_pen()
- create_ipad_stylus()
Some have argued that software architecture is an exercise in deferring decisions and keeping your options open. If this is true, then our refactor supports good architecture because it has opened up a world of options while still keeping pen creation simple for the common cases. Users can take advantage of our factory methods, or they are free to write their own wiring code outside the scope of the pen class.
A second, related advantage is that this method gives us greater freedom to mock the ink-cartridge in test code. In your test setup, just create the mock object and pass it directly into the initializer. I recognize that there are mocking libraries in Ruby which allow you to stub class initializers so that they return mocks, but I find the injection technique much easier to understand, especially when you’ve got a test involving several pens.
The strength of this technique compared with other factory approaches is simplicity. It decouples the wiring from the main problem with very little extra effort. At the same time, it keeps the factory close to the class that it creates (it’s in the same file). Readers will have little trouble understanding how pens are created just by looking at the pen class.
This approach does have at least one potential downside -- it makes pen class directly dependent upon the ink-cartridge class. The two classes cannot be separated even though instances of the pen class don’t care what type of ink-cartridge they refer to. If you wanted to turn your pen class into a library, you would have to include the ink-cartridge implementation as well. This may or may not make sense depending on your context.
Factory Modules
Now consider the case where there are more than a few possible pen configurations. Rather than overloading your class with fifty different class factory methods, you might consider extracting this code into a factory module. You could take this further by grouping similar configurations in separate modules. For example:
module WhiteboardPenFactory
  def create_thin_expo_marker
    ...
  end

  def create_thick_expo_marker
    ...
  end
end

module PermanentPenFactory
  def create_standard_sharpie
    ...
  end

  def create_twin_tip_sharpie
    ...
  end
end

module BallpointPenFactory
  def create_standard_pen
    ...
  end

  def create_erasible_pen
    ...
  end
end
The strength of this approach is in the complete separation of wiring code from the problem domain. The pen class knows nothing in particular about the components of which it is composed and will not need to change when new pen variants are added to the system.
Similarly, the factory modules aren’t required to generate instances of the pen class. There may be, in fact, several pen classes with completely different implementations. Users of the factory modules needn’t be concerned with the specific type of pen that pops out of the factories, as long as each implementation adheres to a common interface.
The factory module approach does come at a cost. Because the wiring code is totally separated from the domain, readers will likely have a harder time understanding where and how pens are created, especially if our factory modules are spread across a large codebase.
Factory Classes
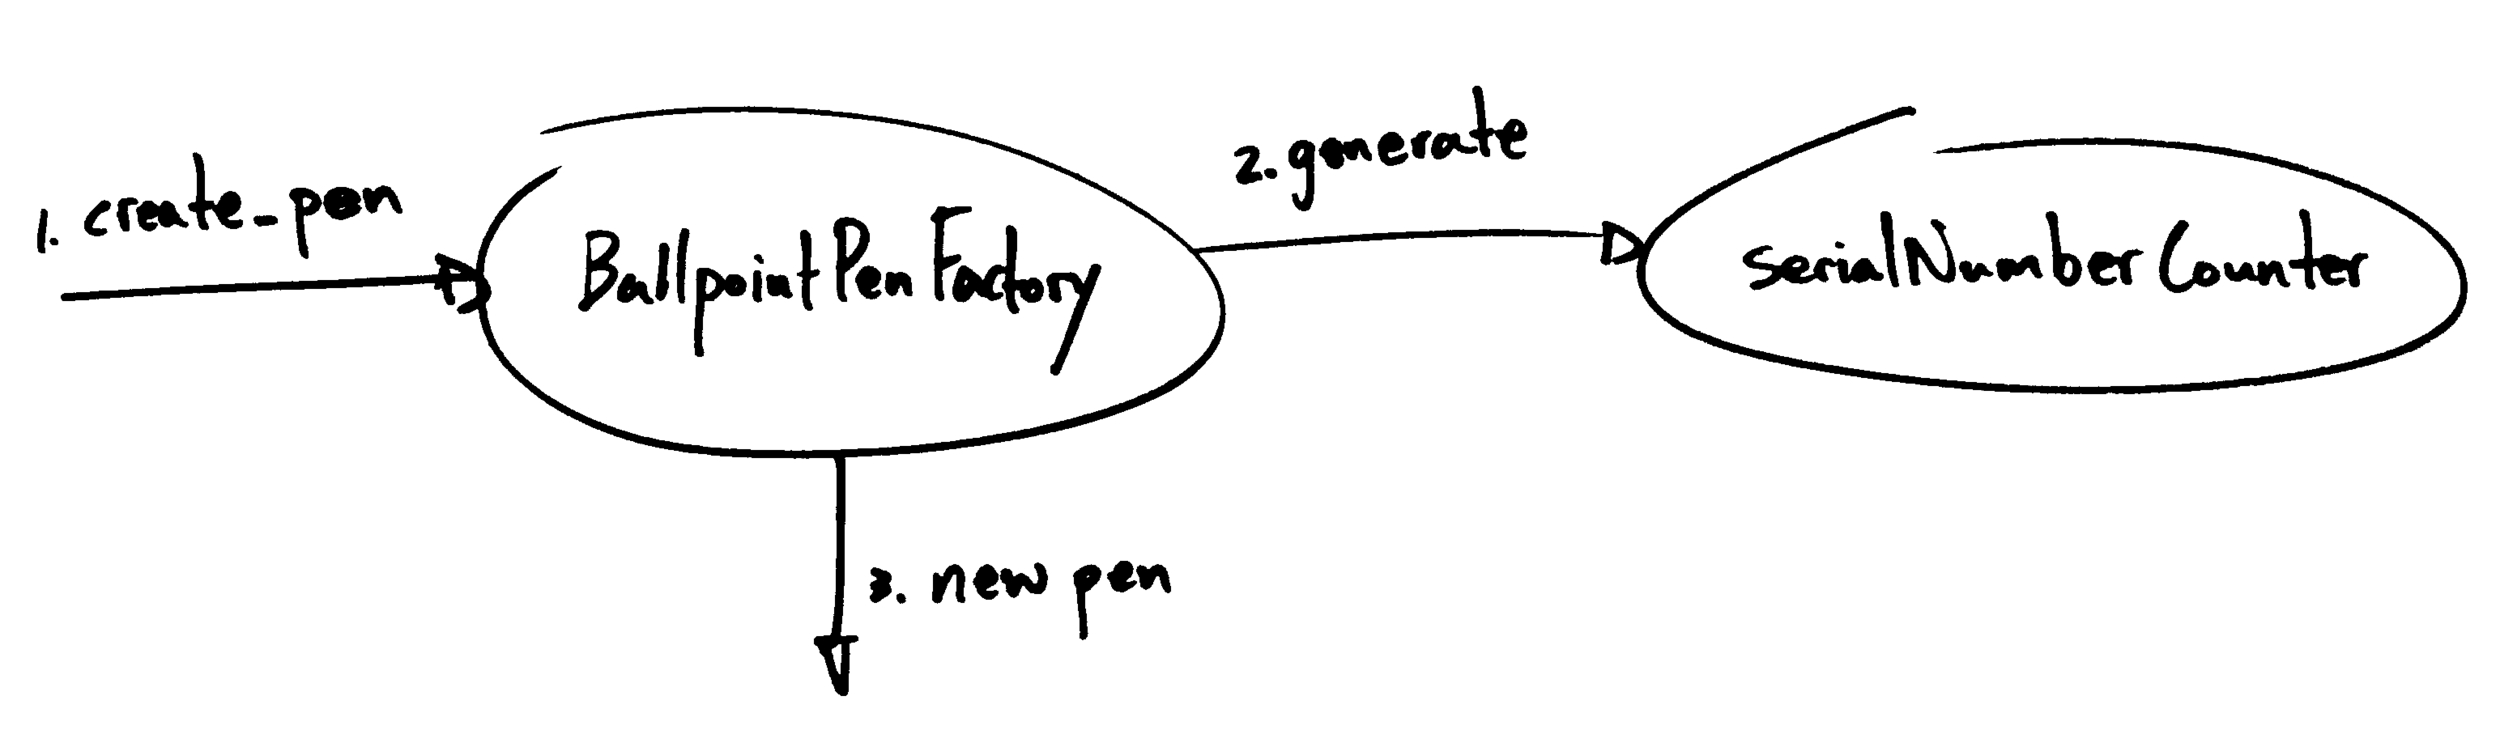
Sometimes wiring is not as straightforward as calling the appropriate factory method. The first factor that can complicate wireup is the need to maintain state across several invocations of a factory. In our pen example, what could we do if each pen needed a unique serial number? We might achieve this by maintaining a counter to generate successive serial numbers, passing each serial number as a parameter to the factory method.
However, this approach is cumbersome for the user, who shouldn’t have to care about the details of how the serial numbers are generated. Instead, these details should be hidden within the factory itself. Why not write a factory class that can maintain the counter state internally? The factory would store the counter as a member variable and increment it whenever it created a new pen. This process is transparent to the user of the factory class.
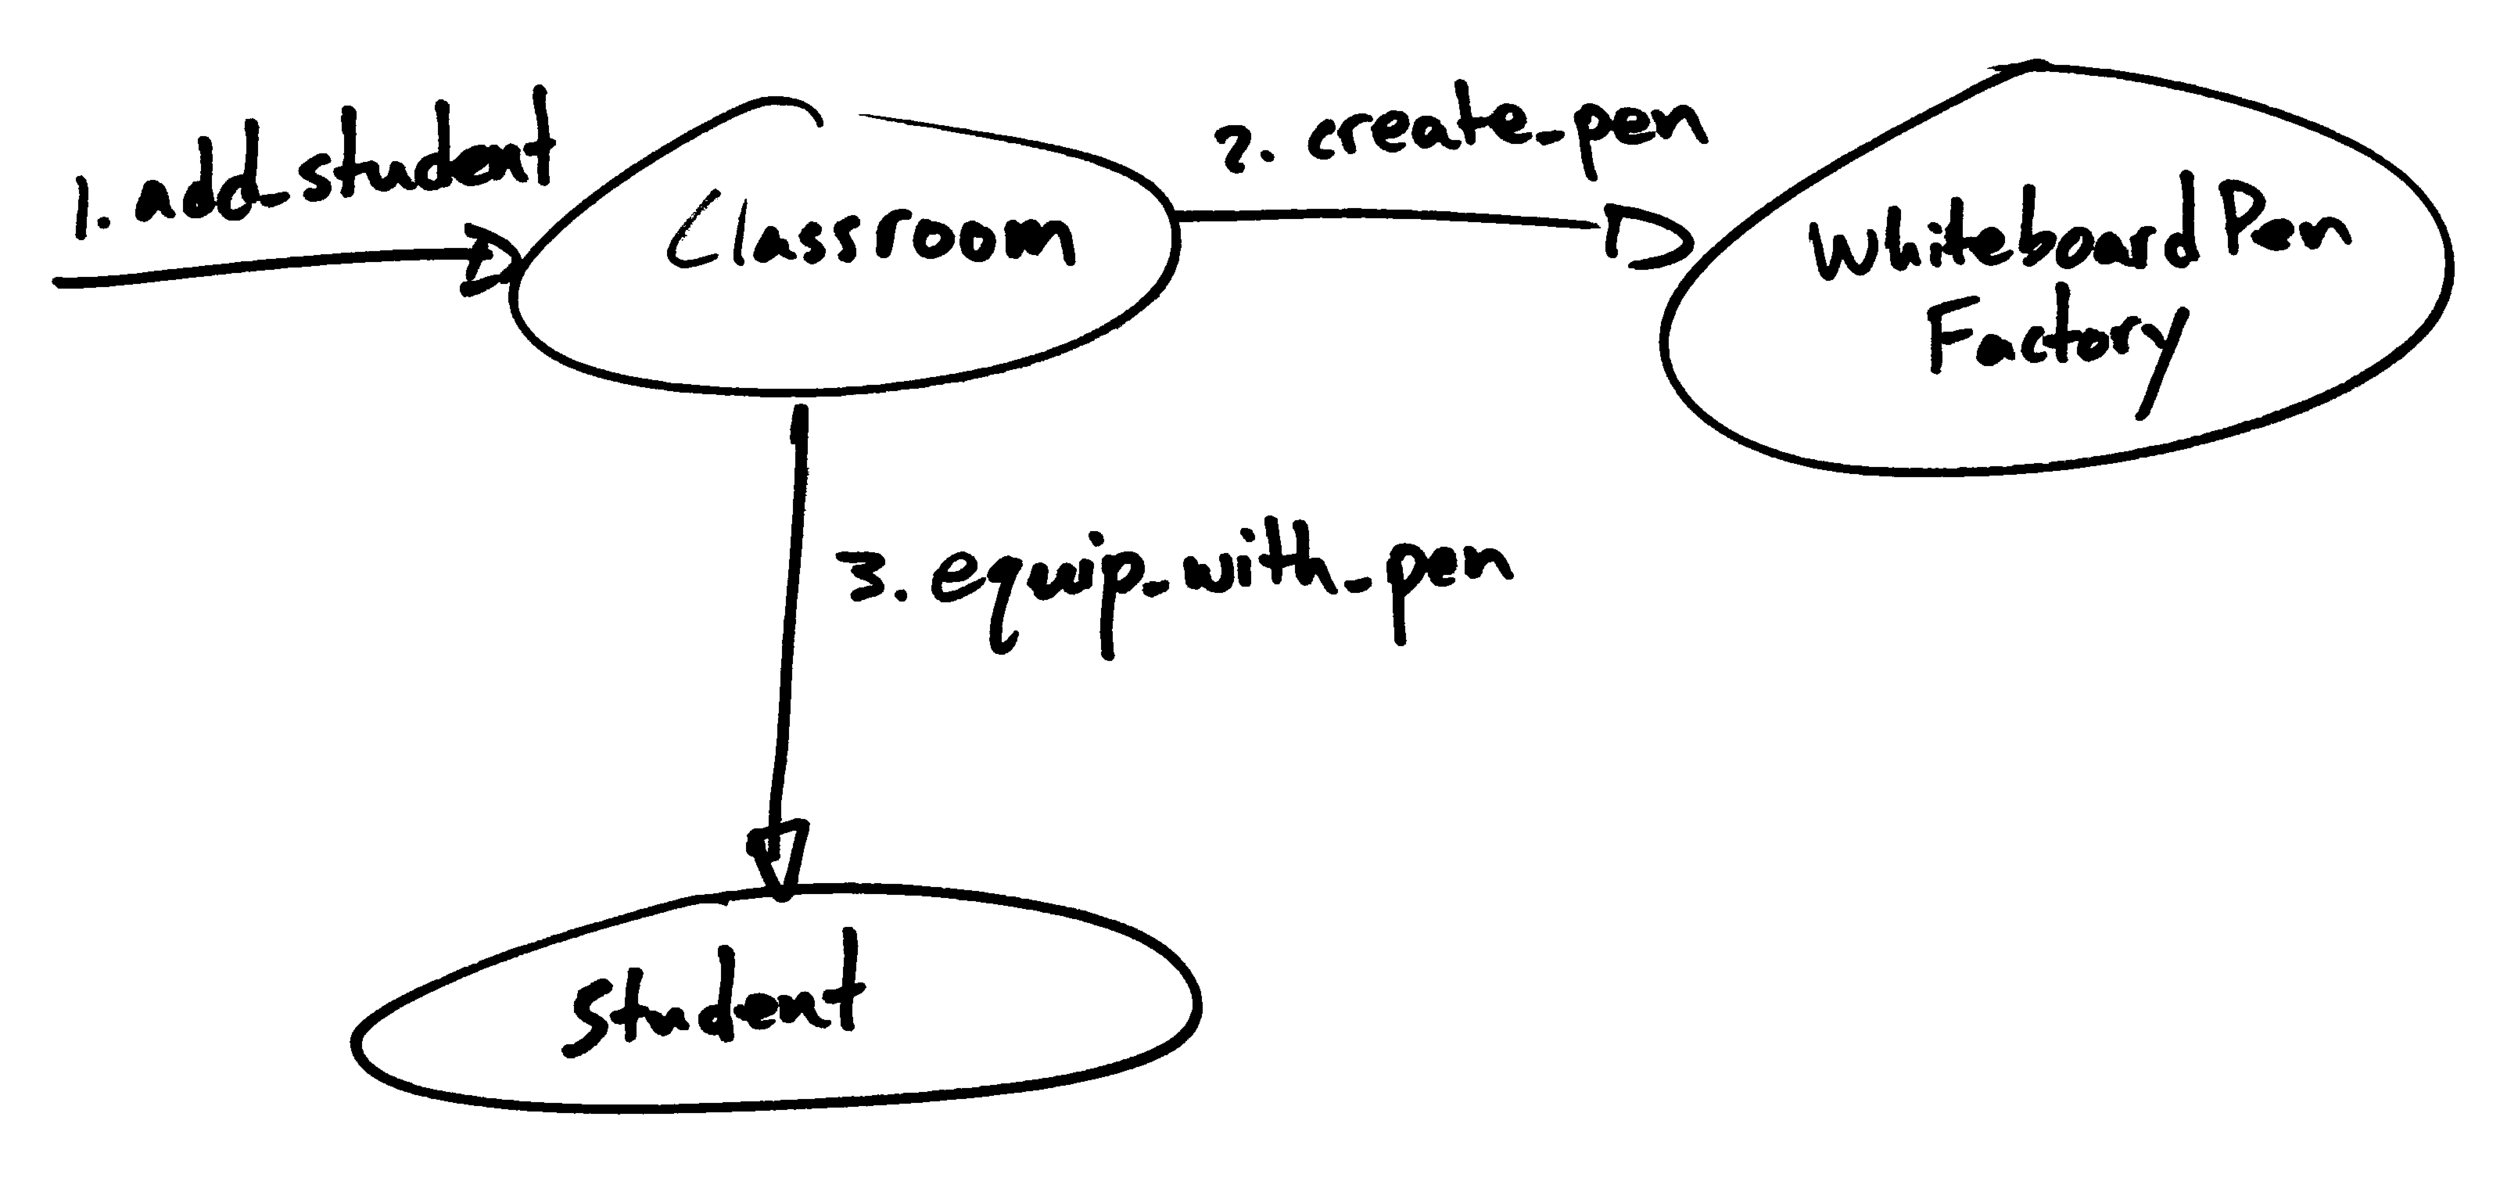
Another reason you might create a factory class is if you have a system that needs to create components but doesn’t care about the specific type of component created. Imagine we are modeling a school classroom. The classroom must provide one writing implement for every student who walks through the door.
When we create the classroom, we can inject a ballpoint pen factory into its initializer. The classroom calls create_pen() on the factory instance each time a student enters the classroom. Once again, this approach helps us keep our options open for future extension. For example, we might decide that students will write on whiteboards. In this case, we simply inject a whiteboard pen factory into the classroom. The classroom itself doesn’t need to change in order to support the new behavior.
This approach is probably the most flexible of the wiring options we’ve discussed. It allows the developer to fully separate wiring code from domain code, maintain wiring state, and inject the wiring system into other components. On the other hand, this is also the heaviest approach. If you create a factory class for every class, then you wind up doubling the number of classes in your system. This places a great burden on someone else who is trying to make sense of your system. If you find yourself creating factory classes for your factory classes, you’ve definitely gone too far with this approach.
Sometimes you need the ability to maintain state and inject a factory, but creating a whole new class just feels overkill. In these cases, lambdas fit the bill quite well. They carry context along with them, they can be passed around just like any other object, and they can act as factories. But be forewarned, your lambda can get pretty unwieldy if you have a significant amount of wiring code. If your code starts getting hairy with large lambda definitions, you’re probably best served by extracting it into a class.
I’ve found that it works well to start with the class factory method and refactor to meet the demands of new requirements as the system evolves. Refactoring is generally not too difficult because you’ve already got your wiring code and your domain code separated. It’s usually just a matter of moving the wiring code around into the right location.
Concluding Thoughts
If you’ve done any reading about software engineering, you’ve likely come across the SOLID acronym which attempts to summarize some of the basic principles of software design. In my view, the stuff we’re discussing here is all about SOLID. For example, the separation of wiring and domain code is a direct application of the single responsibility principle. Our example of injecting a pen factory into a classroom is an application of the Liskov substitution principle (classrooms may use any sort of factory that produces a compatible pen), the dependency inversion principle (the pen factory is injected into the classroom), and the open-closed principle (the behavior of the classroom can be extended without modifying the class by injecting a different kind of factory).
I waited until the end of the article to mention these connections to SOLID because I believe that learning the principles from the top down can sometimes leave a person with only a vague sense of their value and how they might be practically applied. This article represents how I personally came to understand and internalize most of the principles of SOLID.
My aim in this article was to emphasize the need for separation between wiring and domain code and provide some simple tools for achieving this separation. In general, my software design approach can be summarized as follows:
- Model the domain draw diagrams showing how the components interact.
- Ask how the components get wired up in the first place and draw more diagrams.
When thinking about which wiring tool to reach for, I usually reach for the simplest one that will satisfy my current needs and plan on refactoring later when requirements change. I’ve found this approach to yield flexible designs that are able to cope well with changing requirements. As with anything, it’s possible to go overboard with this stuff, so if you feel like the code is working against you, it might be time to stop and re-evaluate. This topic is closely related to the topic of object composition. If you are interested in learning more about that, take a look at my previous post. Thanks for reading!